by James W. Walker
15 June 2014
©2014 James W. Walker
E-mail encryption and digital signatures can be accompished using a standard called S/MIME, which uses public key cryptography and X.509 certificates. You can obtain certificates from a trusted certificate authority, but you can also create your own "self-signed" certificates using the Mac's Certificate Assistant program. I have been unable to get self-signed certificates to work with Apple's Mail program, so in this article I will describe how to set up secure e-mail using Thunderbird.
A certificate contains a public/private key pair plus various information about the identity of the user, intended uses of the certificate, an expiration date, and so on. In order for a user Alice to send a digitally signed e-mail to another user Bob, Alice's e-mail program will use the private key from her certificate, but in order for Bob to verify the signature, he must have the public key part of Alice's certificate. In order for Alice to send an encrypted message to Bob, she must have Bob's public key to encrypt it, and then Bob will use his private key to decrypt it. Thus, to establish two-way secure communication, each person must have a full certificate including a private key, and must have the other person's public key.
The easiest way to exchange public keys is by e-mail, but one might worry about someone intercepting a message and substituting a different key. Instead you could exchange public keys on thumb drives sent by physical mail or courier.
A certificate can either be created as a self-signed root, or can be issued by a certificate authority. I don't think it's possible to get Thunderbird to accept a self-signed root certificate, so we'll create our own certificate authority and have that issue a certificate.
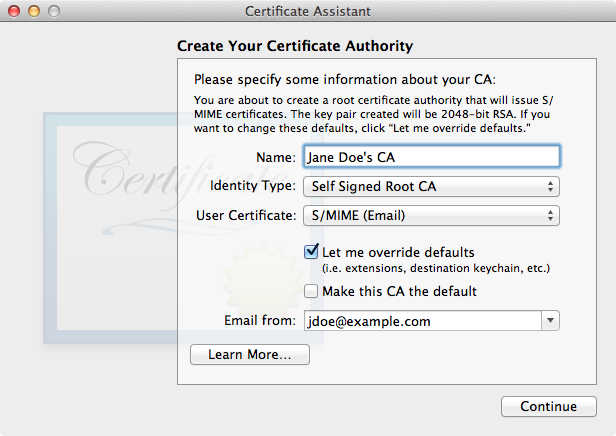
Open the Keychain Access program in your Utilities folder. Select the menu command Keychain Access > Certificate Assistant > Create a Certificate Authority. This will open another program called Certificate Assistant, and present the sequence of forms shown below. In most cases, one can keep the default values, but see the captions below the screen shots for additional hints.
|
||
| Enter a name and e-mail address, and check "Let me override defaults". |
Open the Keychain Access program in your Utilities folder. Find and select your certificate authority. Select the menu command File > Export Items. In the save file dialog, save the certificate as a .cer file.
Next, go to Thunderbird and open the Preferences dialog. Click the Advanced tool bar icon, click the Certificates tab, and then click the View Certificates button. This opens a new window. Click the Authorities tab, and then the Import button. Select the .cer file you just created. A sheet of options should appear, in which you should check the option "Trust this CA to identify email users".
Open the Keychain Access program in your Utilities folder. Select the menu command Keychain Access > Certificate Assistant > Request a Certificate from a Certificate Authority. Fill in the desired e-mail address and certificate name, and select the option to save the request to disk. You will then see a dialog in which you will save a .certSigningRequest file. Then quit the Certificate Assistant.
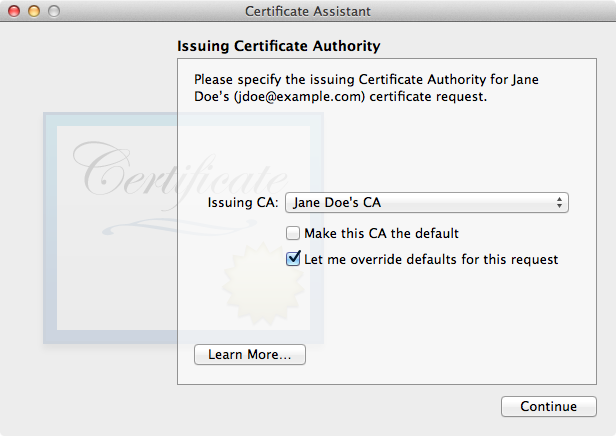
Go back to Keychain Access. Select the menu item Keychain Access > Certificate Assistant > Create a Certificate for Someone Else as a Certificate Authority. The Certificate Assistant will open with a window asking for the CSR file you just created. Drag the file from the Finder onto the Certificate Assistant window. The Certificate Assistant will then present the sequence of forms shown below.
 |
||
| Select your CA, and check "Let me override defaults for this request". |
Open the Keychain Access program in your Utilities folder. Find and select your certificate. Select the menu command File > Export Items. In the save file dialog, save the certificate as a .p12 file. You will be asked to provide a password to protect the file, since it contains your private key.
Go to Thunderbird and open the Preferences dialog. Click the Advanced tool bar icon, click the Certificates tab, and then click the View Certificates button. This opens a new window. Click the Your Certificates tab. Click the Import button. Choose the .p12 file you just saved, and enter the password when asked.
The other person should find his or her certificate in Keychain Access and export it as a .cer file, and do likewise for the certificate authority used to issue the certificate, then somehow send both of those .cer files to you.
Next, go to Thunderbird and open the Preferences dialog. Click the Advanced tool bar icon, click the Certificates tab, and then click the View Certificates button. This opens a new window. Click the Authorities tab, and then the Import button. Select the .cer file representing the other person's certificate authority. A sheet of options should appear, in which you should check the option "Trust this CA to identify email users".
Finally click the People tab. Click the Import button. Choose the .cer file for the other person's regular certificate.